Salesforce Admin Exam Prep Series - Section 1

Section One: Configuration and Setup: 20%
Section Objectives
- Describe the information found in the company settings (for example: company settings fiscal year, business hours, currency management, default settings).
- Distinguish and understand the administration of declarative configuration of the User Interface. (for example: UI settings, app menu, list views, global actions, Lightning App Builder).
- Given a scenario, demonstrate the proper setup and maintenance of users.
- Explain the various organization Security Controls. (for example: Setup Audit Trail, Login Hours, Session Settings)
- Given a user request scenario, apply the appropriate security controls based on the features and capabilities of the Salesforce sharing model. (for example: public groups, org wide default, sharing: roles, subordinates, hierarchy, report and dashboard folders)
- Given a scenario, determine the appropriate use of a custom profile or permission set using the various profile settings and permissions.
This section is 20% of the Exam so I am taking care to comb through this section as much as I can and make sure I understand the concepts. My highlights are not comprehensive because there are so many resources that give comprehensive coverage of the exam material, like Focus on Force for example. Please see how I use the Focus on force material and other resources in my video and blog post about how I am preparing for the Admin Exam. My purpose here is to discuss topics that seem noteworthy or took more time for me to grasp. Also I want to put things in context, so that I can connect what I am learning with the bigger picture of being a salesforce admin. When I am a seasoned admin, I look forward to adding depth the these topics from a higher vantage point. If you have any details, corrections, or input at all, please comment or message me. I would love to hear from you.
Objective One
Describe the information found in the company settings (for example: company settings fiscal year, business hours, currency management, default settings).
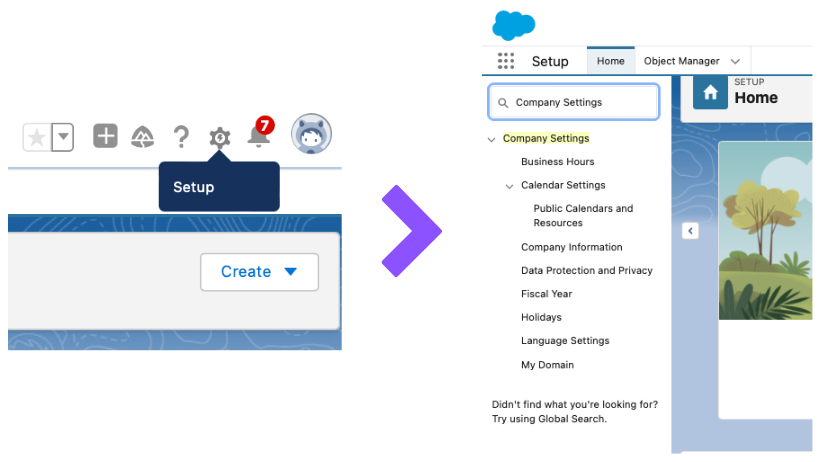
There are eight categories in company settings.
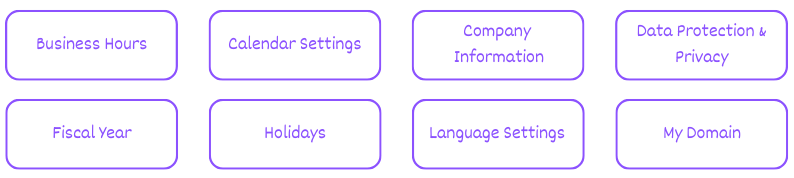
You can see them listed by going to Setup > Quick Find > Company Settings
Of these eight areas, the two that I want to highlight are:
Language Settings
Let’s zoom into Language settings.

Translation Workbench found in Setup > User Interface > Translation Workbench > Translation Language Settings
Now, default language is one of several components displayed on Company Information, let’s see what else is displayed there.
Company Information
Again, company information is one of the eight subcategories in company settings, and contains the organization’s Profile

There’s more information than listed in the drawing below, but these are important areas.

Sup-Topics of Note in Company Information
Locales
Locales determine the display formats for date and time, users’ names, addresses, and commas and periods in numbers. The start day of the week for calendars varies per locale.
Language, Locale, Currency, and Time zone Settings
Language, locale, and time zone settings have something in common:
The Salesforce administrator sets the default, and the user can override that default and set their own in their personal settings.
This same rule applies to currency settings depending on if it is a single currency organization or a multiple currency organization.

*After multi-currency is enabled, the administrator needs to maintain a list of active currencies and their conversion rates relative to the corporate currency
Objective Two
Distinguish and understand the administration of declarative configuration of the User Interface. (for example: UI settings, app menu, list views, global actions, Lightning App Builder).
The best way know your way around the User Interface (UI) is is open a Playground Org or developer Org, and click around –with some guidance. For me the best way to do this has been to use the Focus on Force Study Guide. In Configuration and Setup II, they use slides to go through the relevant user interface topics. I went through each individual slide and tried to find the corresponding information in my org. Ultimately, we will learn the UI as we work and build salesforce org for real stakeholders, however being tested on your knowledge through an exam likely requires a more intentional effort.
There are a ton of UI settings and features but what helps me is to not over think it. We use these same settings in every app or website we use. Many features like hover: to display details, have become standard. I am a frontend web developer so I implement these features daily, but I would suggest become curious and aware of the UI on your mobile devices, apps, and sites you visit. Start to think of user interfaces that you prefer using and why.
Here is some vocabulary I had to sort out before I could really understand what I was clicking on, in the org’s user interface. Technically this information pertains to section 2 of the exam (Object Manager and Lightning App Builder. However, I could not just power through without understanding the different terms being used.
Apps vs Objects vs Records
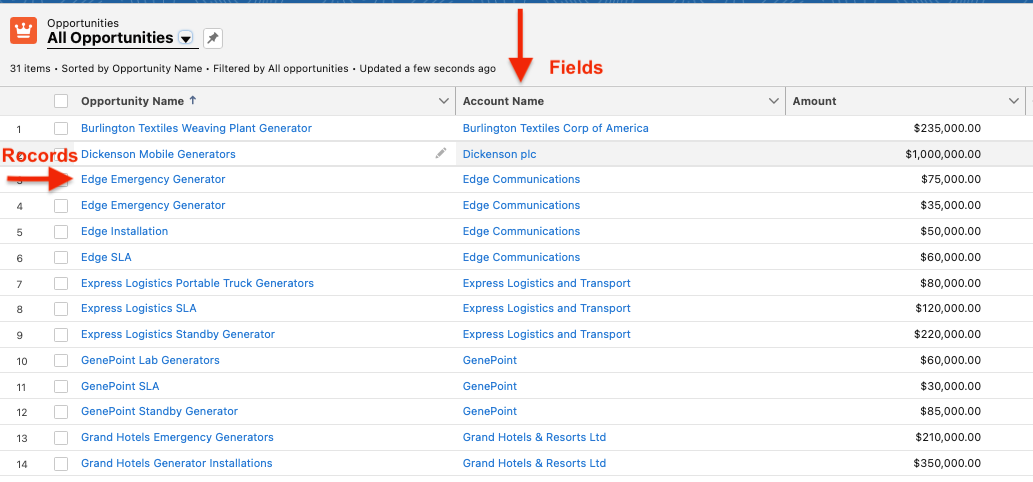
The best illustration I’ve seen to represent the relation between apps, objects, and records is a spreadsheet.
- The spreadsheet is the app.
- The objects are the tabs at the bottom.
- The rows are the Records.
- The columns are the fields.

In the Salesforce Interface, your app name is found near the app icon, and you can expand the app menu to choose other apps.

Here we have the sales app open.

Objects are across the top, the types of objects vary depending on the app.

When you click on an object, you see rows of records and columns of fields, likely in a list view, as that is the default view.
To see more fields in the object record:
Click on the Record >

Click Details >

You will see all of the fields.
💡 I was confused at first, because I did not see any data listed when I clicked on an object.

Playground orgs have dummy data stored in them, giving you something to play around with and to complete trailhead modules. When you click on an app like Marketing, for example, and click on an object, let’s say Opportunities. No records appear. Why not?
‘Recently Viewed’ records, is the default pinned view. In the opportunities object, click the drop-down arrow next to ‘Recently Viewed’ and click “All Opportunities” and you will see a long list of opportunity records. Thank you, Dave Massey.


Home page vs App Page vs Record Page
The best way to understand the differences is the build one of each. I completed this when working through the Prepare for Your Salesforce Administrator Credential Trailmix modules but it did not stick at that time. My guess is, I did not have enough context for what I was doing yet.
I have found that the first introduction to information is not enough. There has to be a balance between 1. being comfortable with not understanding everything, but pressing onward and 2. Revisiting previously covered material because the new material adds more context to what you previously learned.


Record pages, app pages, and home pages can be built and customized in Lightning app builder.

Records Types vs Page Layouts
This SalesforeBen article does a great job explain the differences between the two as well as some of the newer features available that may change the way these are used.
Also, this trailhead live video, explains the difference and their use cases.
OK, let’s get back on the trail, after that small detour…
Where are User Interface Settings Edited?
Setup > Quick Find > Type User Interface

My method to get to know the user interface (UI) settings was to read the Focus on Force study guide and a playground org side-by-side. The study guide is very detailed with screens shots making it easy to follow.
Here are some UI features that I explored a bit more:
The utility bar
This feature is available for lightning pages only. So that means you navigate to Setup > App Manager, the app type must be ‘Lightning’ for there to be a utility bar.

The Guidance Center
This was a great tool that guides you in setting up and enhancing your org. You can fill out a questionnaire that will tailer the content towards tour org and even your level of experience. Read more about this in here.
Objective Three
Given a scenario, demonstrate the proper setup and maintenance of users.
This section is pretty straightforward in terms of how to set up a user however there are a few subjects I looked further into:
- I read about the different types of licenses in the Salesforce Help Docs. There are many different licenses and reading about them helped me understand their purpose as compared to profiles. Click here for a video that was also helpful.
- Freezing vs deactivating. Click here for a video that adds a bit more color to best practices surrounding freezing or deactivating.
- Troubleshooting why a user cannot log in. Click here for a knowledge article in the Salesforce help docs that gives troubleshooting steps.
Objective Four
Explain the various organization Security Controls. (for example: Setup Audit Trail, Login Hours, Session Settings)
Two topics that stuck out to me in this section were IP Ranges and log in hours.
Login hours
To let users log in at any time, click Clear all times. To prohibit users from logging in on a specific day, set the Start Time to 12 AM and the End Time to 12 AM.
- If a user is still working in an org, beyond the set login hours, they will not be automatically logged out. However, when they try to navigate to a new page or take any further action, they will be logged out and they will lose all unsaved work.

Objective Five
Given a user request scenario, apply the appropriate security controls based on the features and capabilities of the Salesforce sharing model. (for example: public groups, org wide default, sharing: roles, subordinates, hierarchy, report and dashboard folders)
I spent the most time on this portion of section one. I had to sort out the differences between users, licenses, profiles vs roles, permission sets vs sharing rules etc. There is a lot to uncover here, these are some of my highlights:
Levels of Security

- Organization Level Security
- Access to the org itself. This is controlled by things such as usernames and passwords, User authentication (single sign-on and multi-factor authentication), trusted IP ranges, profile-level IP ranges, and log-in hours.
- Object Level Security
- The license that is assigned to the user determines which profiles they can be assigned
- Profiles and Permission sets dictate what they can SEE and DO.
- SEE - apps, tabs (objects), records types, page layouts, fields
- DO - CRED (create, read, edit, delete)
- So talking specifically about object-level security, the profile and permission sets would determine the kind of records the user can view, create, edit, or delete. Not the individual records themselves.
- Profiles restrict access, permission sets open-up access
- Profiles restrict access, permission sets open-up access
- Record Level Security
- Access to records the user does NOT own is determined by the organization's sharing model (Private, Public Read Only, or Public Read/Write). The OWD (organization-wide default) is the most restrictive
- Access is opened up to records via
- role hierarchies (vertically)
- sharing rules (horizontally)
- manual sharing (flexible)
- Field Level Security
- Profiles and Permission sets determine what fields users can see and what they can do with them.
- fields can be hidden using page payouts
Profiles
A collection of settings and permissions that determines what users can see in the user interface and what they can do
See the image to see how a Profile changes the User Experience:

Permission Sets
Grant additional permissions to specific users, on top of their existing profile permissions.
Other Considerations
- Roles and License types are set on the user record.
- Object permissions, page layouts, and field-level security are all set on the profile
- Reports and dashboards are shared through folders
- The access level for a report or dashboard folder can be defined for a particular user, group, territory, or role.
- Restriction rules
- Scoping rules
- Account teams
Several resources helped me, mostly videos that I watch more than once, even pausing, and replaying portions of them.
- Who Sees What - Video Series **Really helpful
- Control Who Sees What
- Salesforce Security - Playlist
- Users and Login : 2020
- Org-Wide Default Settings and Role Hierarchy: 2019
- Org-Wide Default Settings and Role Hierarchy: 2020
- Profiles and Permission Sets: 2019
- Permission Sets: 2019
- Profiles: 2019
- Profiles and Permission Sets: 2020
- Security: Profiles: 2020
- Exceptions: Sharing Rules, Teams and Manual Sharing : 2020
So, that list of videos is pretty long, but there are different teachers represented and the way they highlight and emphasize the information in difference ways fills in more knowledge gaps.
Objective Six
Given a scenario, determine the appropriate use of a custom profile or permission set using the various profile settings and permissions.
Taking practice tests are really going to help with this objective, because many of the questions are scenario based. There are also great scenarios given at the end of each Who Sees What video.
Sources:
- Salesforce Certified Administrator Exam Guide
- Salesforce Help docs: Supported Languages
- Salesforce Help docs: Language, Locale, and Currency Settings
- Salesforce Help docs: My Domains
- Salesforce Help docs: User Interface Settings
- SalesforceBen: Customize Your Salesforce Homepage with the Lightning App Builder
- Salesforce Help Docs: App Pages
- SalesforceBen: When to Use Record Types vs. Page Layouts?
- Salesforce Help Docs: Get to Know the Utility Bar
- Salesforce Help Docs: Set Trusted IP Ranges for Your Organization
- Salesforce Help Docs: Field Level Security
- Salesforce Help Docs: View and Edit Login Hours


