Salesforce Admin Exam Prep Series - Section 3

Sales and Marketing Applications: 12%
Section Objectives
- Given a scenario, identify the capabilities and implications of the sales process. (for example: sales process, opportunity, path, and forecast impact.)
- Given a scenario, apply the appropriate sales productivity features using opportunity tools. (for example: dashboards, lead scoring, Einstein opportunity scoring, and home page assistant.)
- Describe the capabilities of lead automation tools and campaign management. (for example: leads, lead convert, lead assignment rules, campaign and campaign members.)
As you can see in the section objectives, our main goal is to be familiar with the features, tools, and capabilities of sales and marketing applications and apply them in a scenario. First, we will revisit the creation of a business process and add paths to the mix. Then we will make the rest of this article an active recall session by turning the need-to-know information into mini quizzes that can be completed repeatedly to practice.
Let’s create a Business Process
We will create a sales process in this specific case because we are using an opportunity record type. Remember:
- a Lead Process is associated with one or more Lead Record Types to apply it to new leads
- a Sales Process is associated with one or more Opportunity Record Types to apply it to new opportunities
- a Support Process is associated with one or more Case Record Types to apply it to new cases.
- Create a page layout
- Ask yourself, what components are relevant to the users of this profile?


- Add custom stages to the stages picklist or Create a custom picklist in the opportunity object
- Ask yourself, do I want to edit or add to the default stages?
Object manager>opportunity object>fields and relationships>Stage
- Is there data that needs to be gathered within this business process that requires a custom field?
Object manager>opportunity object>fields and relationships>New>Picklist
Edit Stages:

Create new custom picklist:
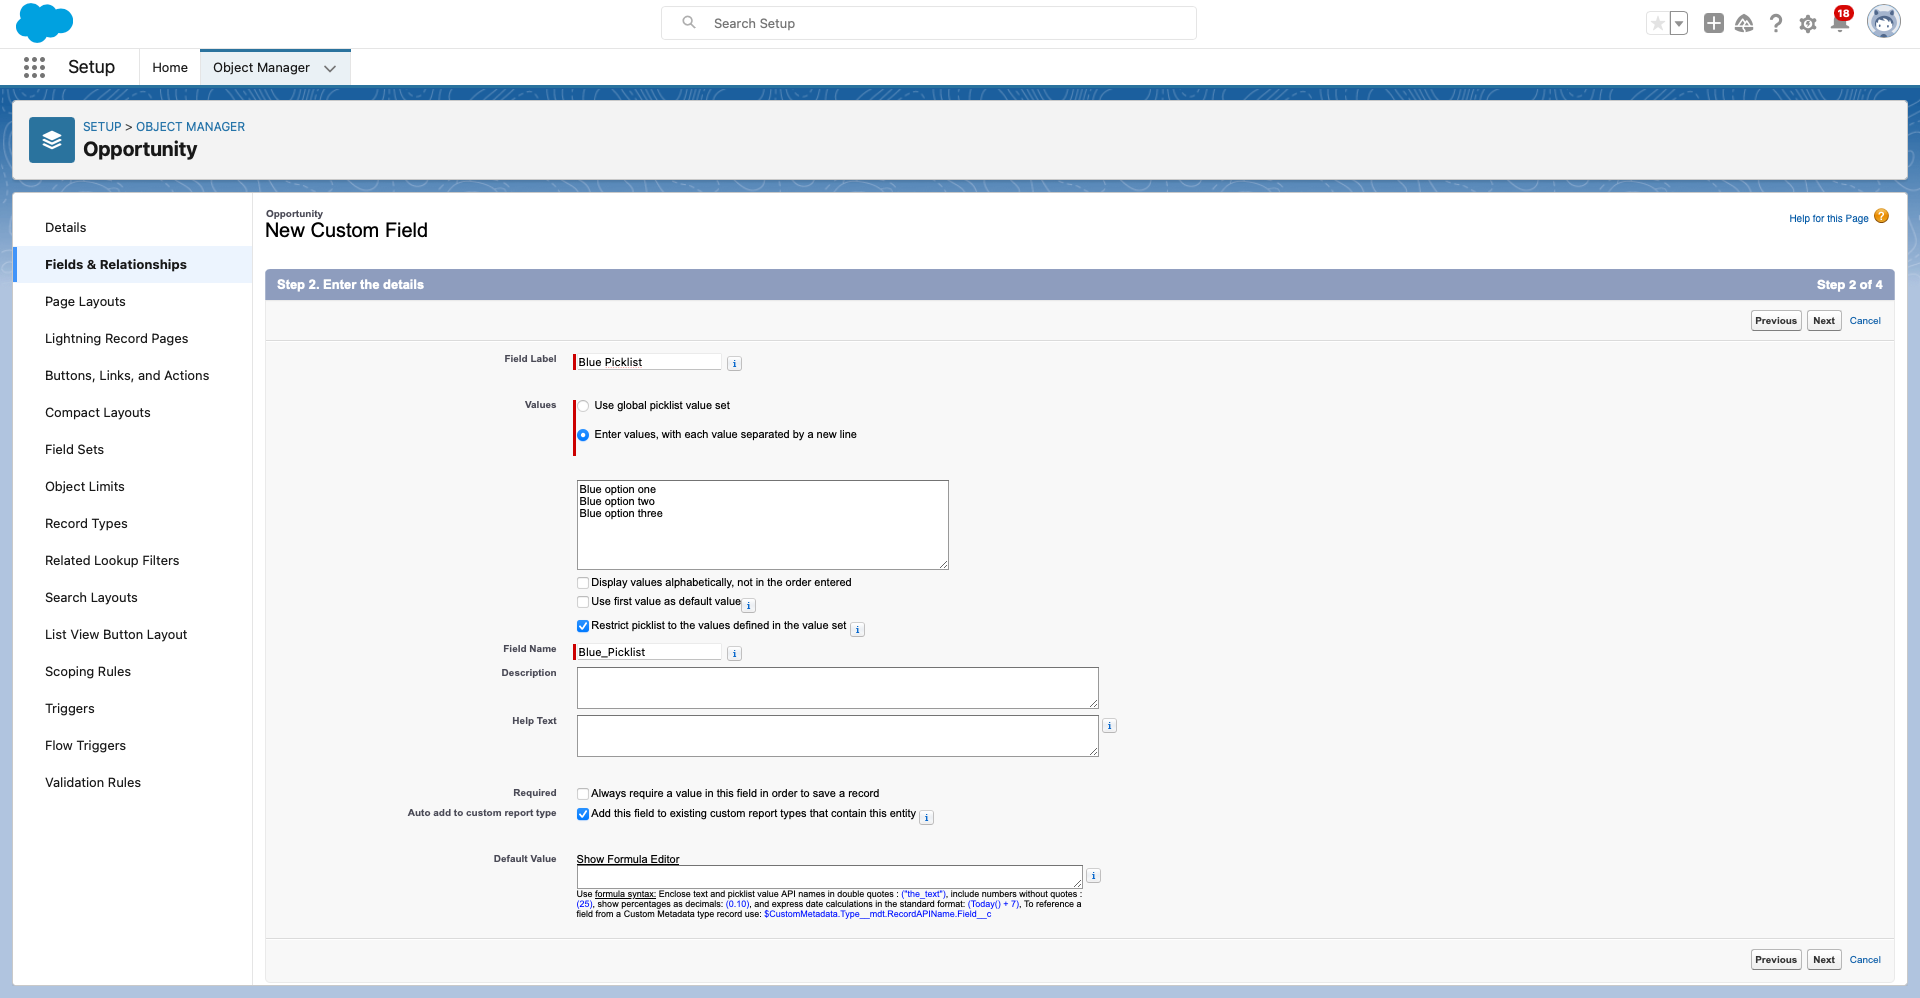
In step 4, of making your picklist, you have the option to add it to the page layouts of your choice, within the object you are making it. It will be added as one of the last fields of the first section of your object record.
Create a Sales Process

By default, there are ten stages in a sales process for an opportunity. If you want to change that, here is the place.
You can think of this as the first door you enter to customize the sales process by means of the opportunity stages. You can keep it broad and only do the least necessary changes which will allow you to reuse this sales process. You will have another chance to be more granular with your customizations in the next step when you create the record type. You will tie your record type to a sales process and therefore will control the stage designations on the opportunity.

- Create a record type
Object manager > Opportunity > Record Types > New
Here you will select the sales process you want to connect it to.
Also at the bottom, you can make this record type the default for the profiles you select or just make it available as an option. This means, that when a user goes to make a new opportunity, they can select the record type that is best suited.

The next step in this record type creation process is to assign the page layout. This can also be customized per profile.

Once you save the new record type, on the next page at the bottom you will have ‘Picklists Available for editing’. The picklists listed here are all of the picklists within that object. When you edit the picklists here within this record type, the changes will only be for this record type because you can add and remove or ‘show and hide’ picklist values based on the record type.

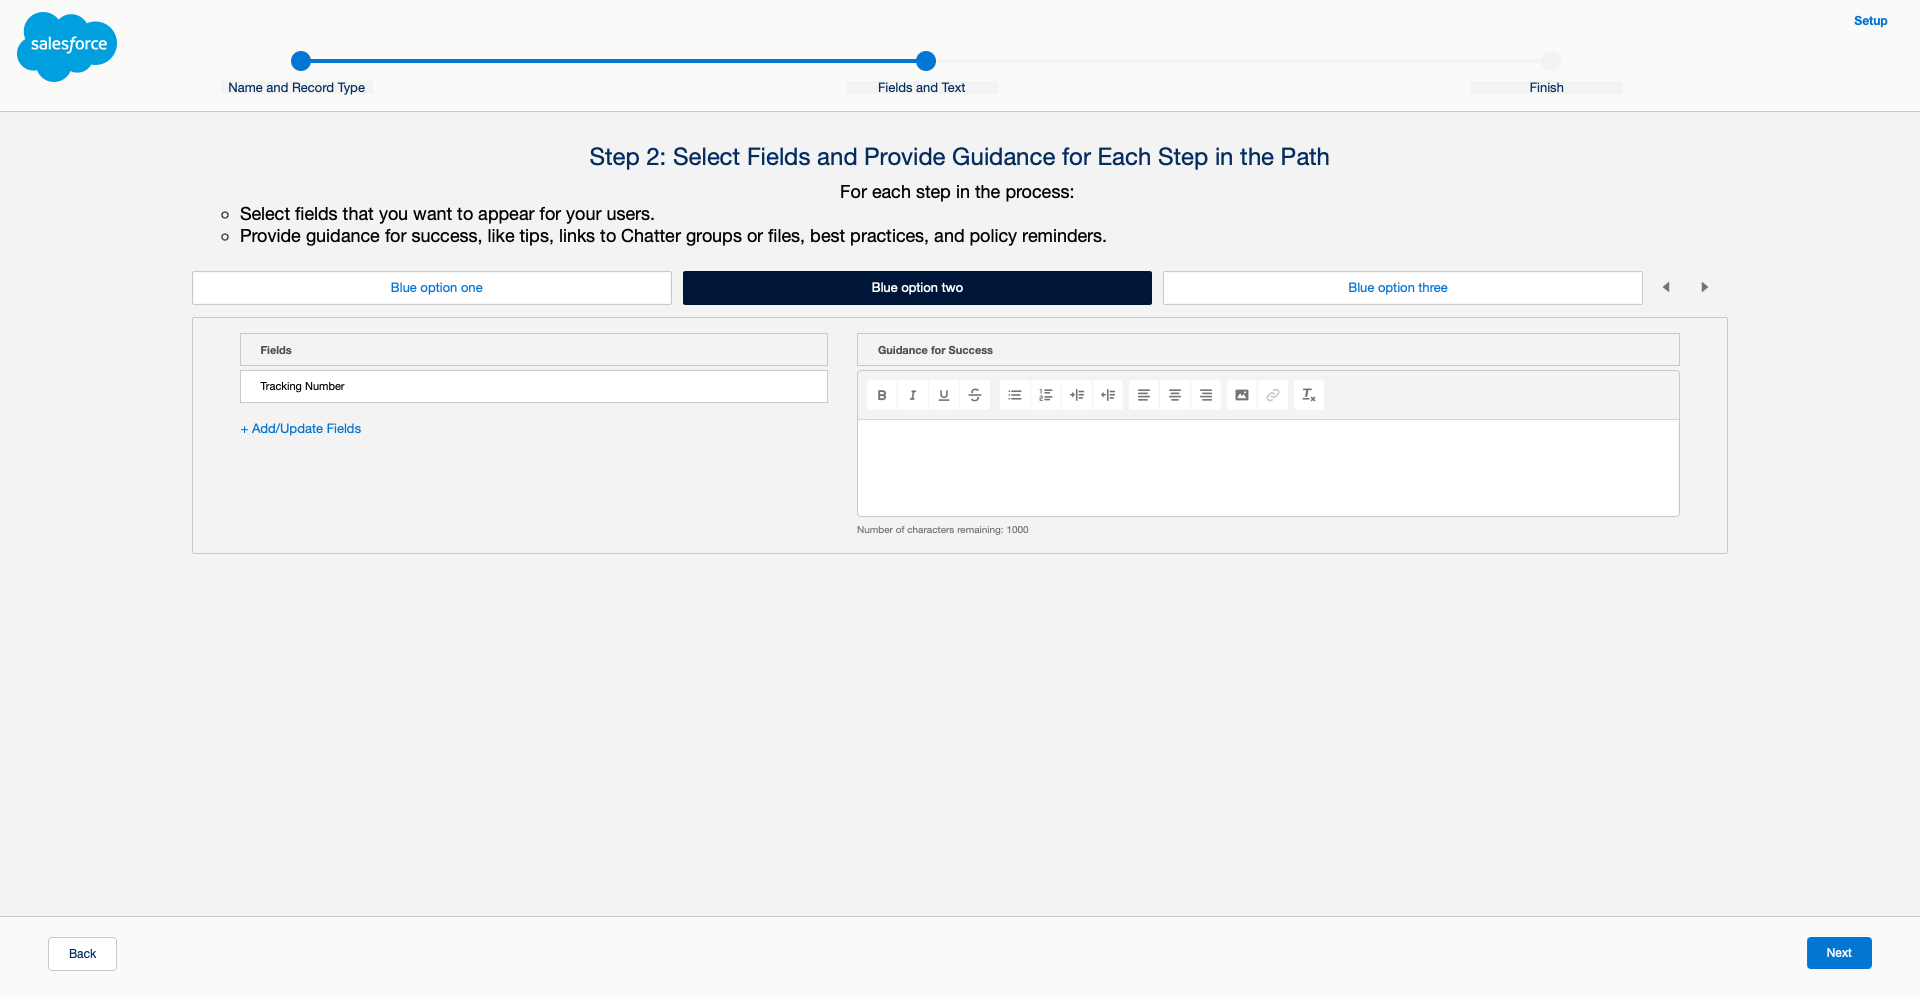
- Create your sales path.
setup > quick find > user interface > path settings > Enable > New path
Here you choose the Object, the Record Type, and the Picklist.
The record types and picklists available will depend on the object you select.

The picklist you select will determine the text inside of each stage on the path.
If I choose the ‘stage’ picklist it gives me the stages connected to the sales process not the record type (if they are different). I made a second record type called ‘Teal’ and edited the ‘Blue’ picklist within that record type page in object manager to illustrate this:
Blue Record Type + Blue Picklist

Teal Record Type + Blue Picklist (Customized by teal record type, I removed Option 2)

The ‘Stage’ Picklist is the same with either Blue or Teal record type selected because it is drawing its stages from the Sales Process.
In Stage two of creating your path, you can add fields that will appear when users reach that stage

Now let’s make a new opportunity and see how our process has turned out!
Sales app > Opportunities > New
Let’s choose our record type

We have our stages for this record type
We have our custom picklist that we added to this page layout.

We see our path with the custom picklist options.

When we change the path to stage two, we should be prompted to update the tracking number field as we configured when creating the path. However, I’m getting no prompt to do this 🤔. If you have an idea of why this could be, please comment and let me know.
When we make a new opportunity, selecting the Teal record type, we have our Blue picklist with only the options we designated within the Teal record type.

💡 You can only have one path per record type. Also once a path is created I have not seen a way to edit the object, record type, or picklist. So you would have to delete the path and create a new one. Make sure to save any information you made in the ‘Guidance for success’ rich-text fields and note which fields you want in each stage so you can re-add them.


As stated at the start, below we have the need-to-know information in the form of mini quizzes that can be completed repeatedly to practice. Feel free to submit these google forms as many times as you like.
Objective One
Given a scenario, identify the capabilities and implications of the sales process. (for example: sales process, opportunity, path, and forecast impact.)
Access the mini quiz here: Capabilities and Implications of the Sales Process
Objective Two
Given a scenario, apply the appropriate sales productivity features using opportunity tools. (for example: dashboards, lead scoring, Einstein opportunity scoring, and home page assistant.)
Access the mini quiz here: Given a scenario, apply the appropriate sales productivity features using opportunity tools.
Objective Three
Describe the capabilities of lead automation tools and campaign management. (for example: leads, lead convert, lead assignment rules, campaign and campaign members.)
Access the mini quiz here: Describe the Capabilities of Lead Automation Tools
This section is filled with many different terms, tools, and features and only time and practice will make these things familiar. Hopefully, these little quizzes will make the information more accessible.
References


